TLDR: A painting estimate template is a pre-built document that lists every cost item for a painting job so you quote consistently and miss nothing. The real trap is not the paint line, it is the prep work, which most painters lump into a single vague number and then eat the overrun. Build your template around prep first, and the rest follows.
Why Most Painting Estimate Templates Fail on Prep
Here is what actually happens on a job. You quote two coats, primer, and labor. You get there and the drywall has water damage, the trim is caulked badly, and the garage ceiling has twenty years of nicotine. None of that was on your template. So you eat it, or you have an uncomfortable conversation with the homeowner.
Prep is not a single line item. It is a category with at least six sub-items. Surface repair, patching, sanding, cleaning, masking, and protection of floors and fixtures are all separate tasks. Each one takes time. Each one burns materials. When you collapse them into one row, you are guessing, and guessing always costs you.
The painters who quote confidently and win at a fair margin are the ones who have broken prep down granularly enough that they can price it almost mechanically when they walk a job.
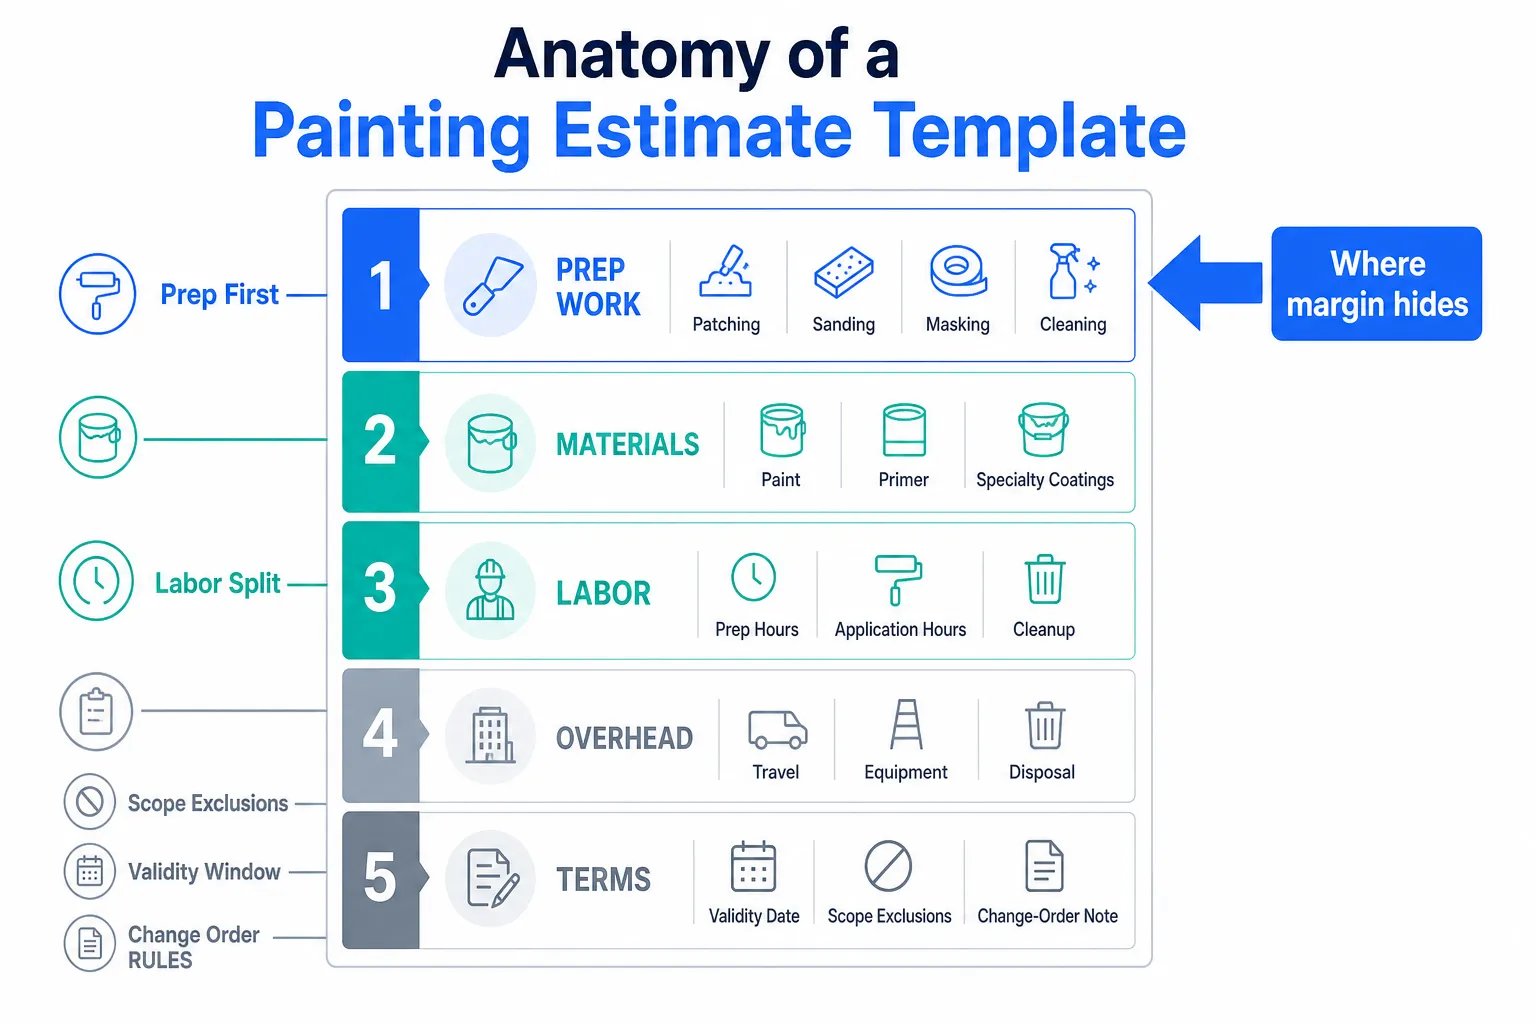
The Anatomy of a Solid Painting Estimate Template
A good painting estimate template covers these categories in this order, because that is the order the work actually happens.
Prep and surface work: patch and skim coat, sand and feather, clean (TSP wash, mildew treatment), prime bare spots or full prime coat, caulk gaps and trim lines, mask windows and hardware, lay drop cloths.
Paint materials: primer by gallon and coverage area, top coat by product name and sheen, specialty coatings if any. Never just write 'paint.' Write the brand, the sheen, and how many gallons the square footage requires.
Labor by task: prep hours separate from application hours separate from cleanup. This is the most common split painters skip, and it is where you lose visibility into what the job actually cost you.
Markup and overhead: equipment wear, travel, disposal fees, and whatever margin you need to keep the lights on.
If your template does not have a separate line for surface repair, add one before you send another quote.
The total at the bottom should be explainable line by line. If a homeowner asks why the job costs what it does, you should be able to walk down the page and justify every row.
Reading the Surface Before You Fill In the Template
The template is only as good as your site walk. Walk the job with the template in your hand, or open on your phone. Look at what you are actually going to paint before you fill in any numbers.
Exterior jobs: check for peeling, bare wood, rot, failed caulk, and rust on metal surfaces. Those are all separate prep tasks. Pressure washing is its own line. Primer on bare wood is its own line.
Interior jobs: check for water stains, ceiling texture that needs to be matched, glossy walls that need to be dulled before paint will stick, and any wallpaper. Wallpaper removal is a full separate scope of work and probably needs its own estimate.
The walk is where you find the money that amateurs leave on the table. Take photos. Note the condition room by room. If something looks borderline, assume it needs attention and price it. You can always credit the customer if the surface turns out cleaner than expected. You cannot go back and add a charge after the contract is signed without a fight.
Structuring Your Template for Faster Follow-Up
Sending an estimate is only half the job. Most painting leads require follow-up before they convert. A homeowner gets three quotes, thinks it over for a week, and the painter who checks in first usually gets the call.
Your template should include a clear expiration date for the pricing. Material costs shift, and your schedule fills up. Leaving a quote open indefinitely means you could be locked into a price months later when your costs have moved. Most painters use a validity window of two to four weeks, but whatever window you choose, put it on the document.
A template that includes a plain-language scope description protects you as much as it informs the customer. Write what is included and what is not. If wallpaper removal is excluded, say so. If a second coat is conditional on the first coat covering, say so. These are the disputes that blow up on the final invoice.
If you are spending time chasing estimates that never get answered, the automated follow-up approach used by estimate software can handle that sequence without you having to remember to text someone a week later.
Common Mistakes That Kill Your Margin
Pricing by square footage alone. Square footage tells you paint coverage. It tells you nothing about prep time. A 500-square-foot room with popcorn ceiling, chair rail, and three coats of dark color is not the same job as a 500-square-foot room with flat walls and a repaint in the same color. The template must reflect the actual job, not an average.
Forgetting masking time. A tight, clean paint job requires serious masking. That is a skill and it takes time. Most painters who lose money on interior work are underestimating how long masking takes, especially around cabinets, built-ins, and detailed trim.
Skipping a change-order process. When the customer decides mid-job they want the closets done too, or you find mold behind a wall, that is a new scope. Your estimate template should reference a written change-order process. Get it agreed in writing before you do the extra work.
Not itemizing cleanup and disposal is a small thing that adds up fast. Roller covers, brushes, drop cloths, tape, and paint disposal have costs. Put them in.
My Take
My advice: build your painting estimate template the same way you would build your invoice after the job is done. Start by listing every task you performed on your last three jobs. Every single one. Then make sure each of those tasks has a row on your template. If prep took four hours and you never break that out, you will never know if you priced it right.
The template is not a formality. It is the job plan. A painter who hands over a detailed, line-item estimate reads as more professional and is harder to undercut on price, because the customer can see what they are getting. Vague one-page quotes get shopped and squeezed. Detailed ones get trust.
If you find yourself rebuilding your estimate from scratch every time, or forgetting to follow up on quotes you sent two weeks ago, that is a process problem more than a template problem. Fixing the process is what actually frees up your time. The voice-based estimate builder we built at Lienzor was designed specifically for painters and contractors who are on the job and cannot sit at a desk to write quotes.
Common Questions
Should I show my labor rate on the estimate? That is a business decision. Some painters show a total labor line without breaking out the hourly rate. Others show hours times rate. Either way, keep labor and materials separated so you can track your actual costs against your estimates over time.
What if the homeowner asks me to lower the price? Go back to the line items. Ask them which scope they want to remove. Offer to drop the accent wall, skip the closets, or have them do the prep themselves. Do not just drop the total and eat your margin. That is how painters end up working for nothing.
Do I need a lawyer to review my estimate template? In most states, a signed estimate or proposal can function as a contract. But contract law varies by state, and some states have specific requirements for home improvement contracts, including the right to cancel within a certain window. It is worth getting a local attorney to look at your template once, especially if your average job size is significant.